Thermal imaging is a service that is often overlooked, but homeowners shouldn’t ignore this helpful benefit. Sometimes your home could have hidden issues, and a thermal imagining inspection can help bring those to light, hopefully before the problem becomes any bigger. Here are some major benefits to getting thermal imaging services:
Our expert team at RAM Builders not only knows how to perform thermal imaging inspections, but we also know the proper way to tackle the repairs. Don’t trust this service to just anyone. Call us with any concerns.
Here at RAM Builders, we do a lot of exterior work. From stucco to brick, roofs to windows, and everything in between, we handle it all. Utah has some intense weather patterns, and these patterns can wreak havoc on a home’s exterior. Water in unwanted places in and around your home is not a good thing. Sometimes these liquid issues seep inside the home, but don’t worry. We can repair damage inside your home as well as outside. Whether you left sprinklers on for too long or mother nature took her toll, RAM Builders can help.
We see a lot of homes along the Wasatch Front with dry rot damages. Dry rot is when the wood inside or outside your home has decayed, generally by a fungus, which diminishes the strength of the wood. Repairing the dry rot is only part of the solution process. Afterward, repair of the drywall must take place. Drywall repairs may seem like an easy DIY project, but there are a lot of considerations to keep in mind before tackling this task. Experienced drywall repair specialists know how to repair and install drywall so that you can’t see the seams or the heads of the drywall screws popping out. They can see the big picture from start to finish. For a seamless and smooth look, trust a pro.
Utah is fairly dry overall, but we do see heavy rainfall occasionally and very heavy, wet snow in the winter months. Stucco leaks are common, especially if it was installed poorly. (To prevent poor installation, call RAM Builders to make sure it’s done right!) When water gets underneath stucco, it softens the stucco and creates bubbles or cracks. Stay on top of the health of your stucco by getting it assessed annually and paying attention to any signs of wear throughout the year. If you didn’t notice water leaks in your stucco outside, you’re sure to notice the issue once it gets inside your home. It’s common to see drywall damage especially around the head of windows if the exterior stucco has failed. You’ll need to get the leaking areas repaired outside as soon as possible then have an expert make sure the fixed drywall inside is faultless and durable. To tackle the entire project with ease and proficiency, give us a call.
When fixing drywall, it’s important to ensure paint colors and wall textures match and that all seams are flawless. RAM Builders is meticulous, and our crew is clean and respectful of your property. An experienced team like ours will get the job done quickly and efficiently without any stress of the “what ifs” or the worry of if the job is done right. If you notice any leaking or rotting issues on the outside or inside of your home, get in touch with us today. The longer these issues are put off, the bigger the repair project will be. Check out our client testimonials to see all the great things Utahns have to say about us.
Go to sleep Christmas Eve confident that Santa’s sleigh won’t crash through your rooftop. Utah’s winters are harsh on our homes, and the roof takes on a heavy toll. From wind to heavy, wet snow to freezing temperatures, your roof needs to be in tip-top shape. When that sleigh makes a clatter, you don’t want to see that a failing roof was the matter. Roof repairs and replacements should only be performed by highly trained workers. It’s common for people to repair roofs with replacing shingles only but a strong roof goes far beyond shingles.
Underneath those pretty shingles is roof underlayment, which is a barrier material installed before shingles that protects the inside of your home. Usually, the material consists of step sheathing, OSB (boards made from ground wood stands with wax and adhesive), or plywood. No matter how great the installation of your shingles is, the roof underlayment should be installed properly to prevent leaks. This is not the place to cut corners. If you have a roof leak and you’ve been told you only need to replace your shingles, this is likely a mistake. Leaking is often caused by poor roofing underlayment conditions and incorrectly installed flashings. With something as important as the cover protectant of your home, the roof is not the place to sacrifice quality work.
Your roof connects to many features of your home, such as rain gutters, chimneys, and exterior materials like stucco or siding. Care must be emphasized at these connection locations. This can only be done with a team of professionals who truly understand the different elements involved in these processes. Every connection is a chance for a leak. If you’re concerned about the condition of your roof, getting a thorough analysis from a reputable company will be your first step. It’s usually good to get a few bids and keep in mind, the lowest number is not always the wisest choice. You want a roofer that will be up front about their costs and know that they’ll do the job right, not fast and cheap. Santa should be able to stop on your roof for more than 20 years with a good roof installation with asphalt shingles. For metal roofs with proper underlayment, he can feel confident landing his reindeer on them for over 50 years.
Roofs are often being decked out this time of year with lights and décor. Falls from hanging lights hit over 14,000 last year. Before hanging those lights on your roof, take precautions like getting a new, quality ladder, and don’t hang them while it’s icy out. We generally don’t recommend you getting on top of the roof and walking around to find that perfect placement for Santa’s beacon. In addition to fall hazards, walking on asphalt shingles can damage them, so consider a professional if you really want something on your rooftop. You also want to be careful not to damage your home with staple scars or holes while hanging lights; instead use light clips as a safer alternative.
There are numerous ways to improve your home, and two areas that provide a great return on investment are upgrading windows and upgrading exterior doors. These enhancements are beneficial for anyone looking to improve the aesthetic of their home as well as efficiency. It’s easy to paint your front door, and that can be an appealing and quick update, but if your door is old, it may be letting out a lot of air from your home. A common dad line is: “I’m not paying to cool down (or heat up) the entire neighborhood!” but that’s what a lot of homes are doing without us realizing it.
Leaking doors don’t always need to be replaced. Sometimes they can be fixed with the proper application of tools and professional installation. For example, a metal or vinyl door pan can be added below a door threshold to reduce drafting or water infiltration possibilities. After the appropriate fixes, RAM Builders can paint or stain the door to make it look beautiful as well as function efficiently. Installing a new door may be needed for many reasons ranging from security needs to design desires. Three-point locking systems are common on newer doors, providing peace of mind to your family.
Over time, sliding doors can become stiff, making them hard to open and close. Large sliding glass doors that are single pane let out a lot of air from the inside of your home, making them very inefficient. Upgrading to a high-quality sliding door will reduce frustrations and will save you money immediately. Mother Nature will thank you, too. Your doors get a lot of wear and tear, making it one area that you don’t want to cut corners.
Windows are a valuable upgrade for any home of any age. Older homes with original windows likely have resources constantly flowing out of the glass wasting your hard-earned money. Additionally, your home may sound louder with the inefficient windows letting in outside noises. New windows have a lot of benefits that go beyond efficiency and looks. They improve the comfort in your home by preventing drafts and excess dust to seep in and they can be easier to clean with a number of upgraded design options. Plus, they also make it a more pleasant experience for you to look outside while watching the weather roll by or the kids play in the yard. Many older homes have small windows, making the inside of the home feel dark. We can expand those windows creating much-desired light and openness for your home.
Window companies are common around Utah, but don’t get taken advantage of. You want to pick a reputable and experienced company to ensure your windows are installed correctly and in a timely fashion. Often, it’s not the cheapest or fastest option you want, especially when it comes to an important upgrade like this. RAM Builders can update and upgrade anything the outside of your home needs. No matter the size of the job, call us today for a free assessment and quote.
Dry rot is like mushrooms. It’s a fungus that can get established in wet wood. Dry rot doesn’t happen in dry wood, the wood has to be moist. Normally dry rot occurs where there is a water leak entering the home. As the fungus matures, it shrinks and cracks the lumber.
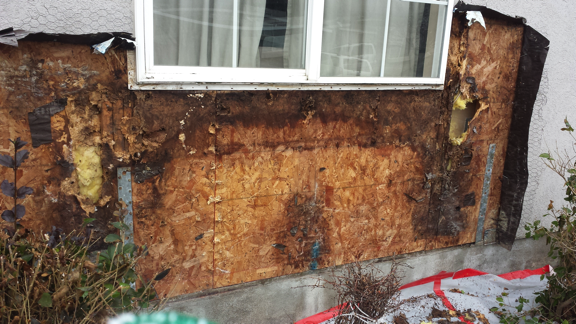
Even after the water source (the leak) has been repaired, the fungus that causes the dry rot will remain. This fungus can survive a wide range of conditions by staying dormant when its too wet or dry. Once the dampness of the wood returns to the ideal range, the dry rot starts to grow again.
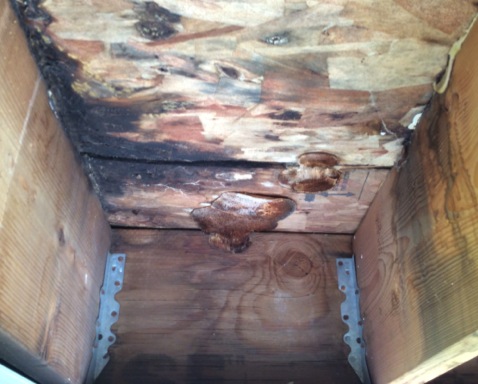
The most important advice for any homeowner with a wet wall problem is before beginning any construction repairs to the dry rot area, be sure that you find the location of the water source/leak and make the proper repairs to eliminate any future problems. The following are some common problems to look out for.
This type of rot shows up at the lower corners of the windows and spreads out from there. In extreme cases, the entire wall area under the window can be rotten. To solve this problem, the window will need to be removed. At times the said window may need to be replaced due to it being compromised/damaged or a window pan may need to be installed. The window will then be re-installed and correctly flashed.
Improperly constructed connections are a common problem. Keep an eye out for trouble in these locations:
- Eave to wall connection
- Roof to wall connection
- Eave to roof connection
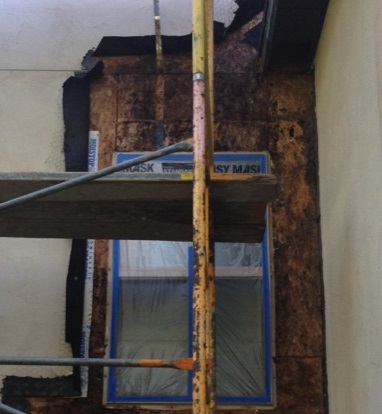
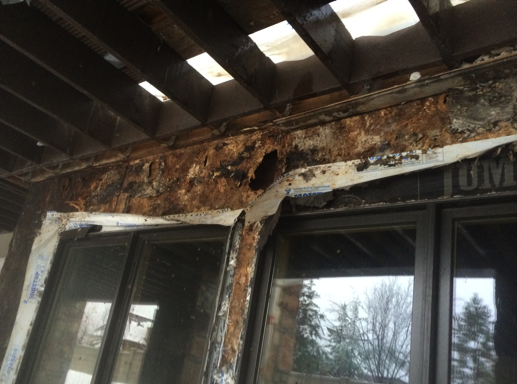
New construction is exciting. Whether you’re starting from scratch or remodeling an existing building, you expect you’ll end up with something better than what you started with.
But unfortunately, that’s not always the case.
New, inexperienced, lazy or poorly managed construction companies can make mistakes, turning your exciting project into a nightmare. When it’s your home they’re working on, the decision lies with you on how to deal with the aftermath. But when you live in a community with a homeowners association, it’s the HOA that makes the decisions, not you.
And far too often, they make the decision to file a lawsuit. If the outcome of a lawsuit was that the wronged parties received restitution, I would be all for it. But I’ve seen these lawsuits dozens of times, and I can assure you, rarely do I see a happy ending.
When an HOA files a lawsuit against a construction company for a construction defect, the result is not a pile of cash delivered to the next board meeting on the calendar. These lawsuits can drag on for years. And they’re expensive.
Many area Utah law firms will take an HOA’s case on a contingency basis, which means the HOA doesn’t pay its lawyer until the construction company pays them. Good deal, right? No expenses for the HOA until it gets what it rightfully deserves.
Not exactly.
Legal fees aren’t the HOA’s only cost. They also have to pay for expert opinions, destructive testing, emergency repairs and engineers as the lawsuit progresses — not after it collects. This can get costly, leaving the HOA in danger of becoming insolvent.
I worked with an HOA in Lehi, Utah, that had to wait 14 years to collect the money they won. Once the law firm took their contingency fee, the HOA didn’t have enough left to pay for the repairs the buildings needed. So the HOA prevailed, but they still lost.
Further, the aforementioned lawsuit severely inconvenienced homeowners who couldn’t sell their home for the 14 years it was going on. Selling a home that’s tied up in a lawsuit can be nearly impossible.
During the time litigation is pending, property value is diminished. Even if the owner could find a buyer and was willing to take less for their home, banks often won’t lend money on houses with construction defects.
The homeowner could rent out their unit, but then they would have no equity to apply toward their new home. With dues rising to pay for the lawsuit, it could be hard for them to cover the mortgage and the related expenses on what they collect in rent.
In fact, it can be difficult to pay these expenses even if they don’t want to move, as soaring HOA fees can strain a budget until it breaks.
Instead of filing a lawsuit against the construction company, HOAs would be better off repairing the defects on their own.
I know; it sounds unfair. The construction company was at fault; they should make it right. But should and will are two different things, and by making the repairs on their own dime, the HOA will usually end up spending less money.
Not only will they save on legal and expert fees and court costs, but they will be able to make the individual decisions about how to proceed during the repair work. A legal agreement or decision will frequently require the work to be entirely redone, when it could easily be repaired for a fraction of the cost.
If your HOA wants to put the time and effort into a lawsuit, there are steps it can take to mitigate unnecessary inconvenience and expense to residents.
Destructive testing is so-called for a reason — parts of a building that work fine are destroyed in the process of seeing whether they or other parts are sufficient or in need of repair. In performing this necessary step in the lawsuit, further damage is done and residents are made to suffer more.
I was recently on-site at a project where openings had been made in the homes’ exteriors as part of destructive testing. While these openings had been patched, not all were patched well, and some leaked. The luckiest residents only had ugly patches on the exterior of their homes; the unlucky ones had leaks to deal with as well.
The shocking part? Residents had been living under these conditions for seven years, as the lawsuit dragged on with no end in sight.
A more sensible solution is to do the repairs at the time of the testing. Expose the issues, document them and fix them. You’ll have an exact cost of repairs versus an estimate, and residents won’t have to live with leaks or ugly patches.
So even if an HOA is convinced that a lawsuit is the way to go, it should, at the very least, repair the damage as part of the process rather than letting it fester for years, unchecked.
RAM Builders has worked on hundreds of home exteriors along the Wasatch Front since 1996. Some cost millions of dollars and others are starter homes. Regardless, no homeowner likes spending money to tear a home apart and put it back the same way it looked when they bought it. But being able to control when and how it is done makes this tough job a little easier.
A leak in your roof is usually related to the way the felt papers or roof underlayment were installed prior to shingle installation.
It’s common for people to try to fix leaks on a roof by placing sealant over the exterior of the shingles. This may work in situations where a hole formed after the roof shingles were installed, otherwise the only way to permanently fix a roof is to remove the shingles, fix the roof felt and underlayment, then install new shingles.
To fix a leak that is coming in where the roof and another part of the homes exterior meet usually requires removal of the shingles and the adjacent part of the homes exterior. In this situation, the problem is probably related to the way the homes exterior underpayment and the roofs underlayment tie together.
When fixing a leak it’s pretty common to see the two different exterior claddings underpayments just butt into each other, rather than overlap.
If you have a leak, either in the roof or where the roof meets another part of your homes exterior, sealant probably won’t be a permanent solution. Only removal of the shingles and adjacent exterior cladding will allow you fully address the problem.
Ram Builders specializes in remedial construction projects such as these. Our ongoing association with top building scientists and forensic engineers gives us the unique knowledge to fix these types of leaks the right way! Contact us for a free quote.
Missing or improperly installed window flashing can cause major problems. Most of these problems go undetected for many years. When we are finally called out to the job, it is often too late…..
We see mold and organic growth in the driest desert climates. Trapped water in the wall system of a wood framed structure can cause significant damage.
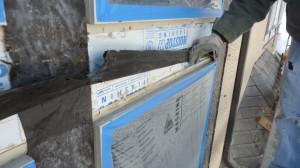
Using window flashing is a must, but installing it properly is even more important. The flashing at the top of this window is directing water right into the home.
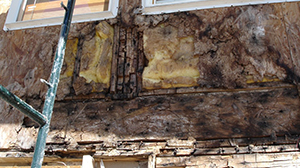
No window flashing was used on this home. No window leaking, no stucco cracks, just a musty smell inside the home.
Window leaks are more common than you would think.
Hidden Damage
When your home has a construction problem, most people want the quickest, cheapest, and easiest fix. If you're told by the handyman that it can be fixed for $50, why spend $500 with a specialized contractor? Many people do not put a high value on our home when it comes to repairs, and we're guilty of it, too! After all, who wants to dump money into a project that gives you no return?
No one thinks they have a major problem. It’s a small amount of water collecting on the window sill, bubbled paint, or damp carpet that generates the phone call. The scary thing is that a window could have a serious leak and you would never know it.
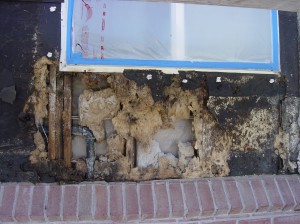
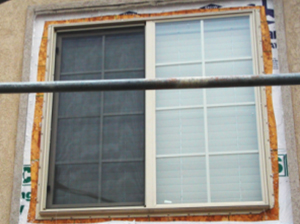
Window Replacement…..fail
We are not always the first company to get the phone call when a home owner thinks there is a problem with their windows. Window replacement companies have been ‘fixing’ window leaks for years. Cut out the old window, slam in the new, and a bead of cheap caulk is the only defense from water intrusion.
On many occasions we have been called out to look at at a home where windows were previously replaced by another contractor. When we show up and see a flush fin or ‘Z’ bar window installed over the exterior cladding, or a window caulked to the exterior cladding, the answer can be hard to swallow: “Sorry ma'am, but the $30,000 you just spent to replace your windows was a complete waste of money and now you have to throw them away and start over.”
Window Replacement Companies
It does not matter what type of exterior cladding you have when trying to decide what to do with your windows. Whether it’s stucco, siding, stone or EIFS, the method of repair should be the same. If you use the cut and caulk method to replace your windows, it is not a permanent fix and often times you will create a much more serious problem.
I hear the ‘used car sales approach’ from siding and window replacement companies on the radio all the time; “Simply the Best for Less” is a commonly heard slogan on our local talk radio station. Window replacement companies are in the business of selling you new windows. They do not make money on the labor and cannot use proper methods because the cost would be way too high for most homeowners. Offering the “Best for Less” should be saved for the local used car salesmen.
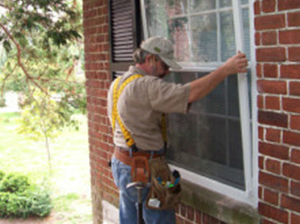
The Proper Approach to Window Replacement and Leaks
Many times when we arrived at a home with leaking windows, we will see caulk smeared all over the exterior of home. Attempts to caulk the window to the exterior cladding will not fix the problem. It is important to remember that the vapor and moisture barrier on your home is what keeps water out, not caulk. (to learn more about this, watch our video “What’s Happening behind your Stucco”).
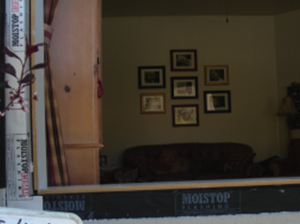
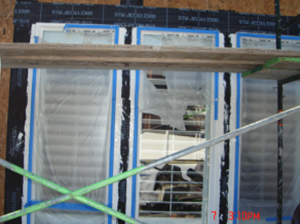
When you cut through the barrier or existing window flashing, you will leave an avenue for moisture entry no matter how much caulk you try to pump into the gaps. The process of tying in the window frame with the moisture barrier is done using specific window flashing materials. The only way to truly replace your windows, or fix a leaking window, is to tear off the exterior cladding around each window and properly integrate the moisture barrier with approved window flashing material and sealant. This process is not easy, and is often costly when working on existing homes. If builders would pay closer attention to the installation of the windows during original construction, the problems we see with window installation could be reversed for very little additional cost. I do not believe that Home Builders skip the important steps when installing windows to save money. Ignorance is generally the real problem. Knowledge = the competent builder.
Cracking and staining below a chimney cap
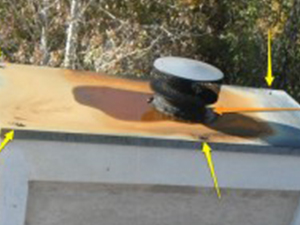
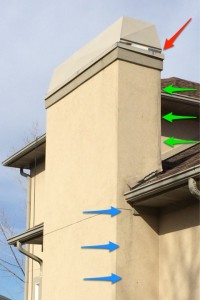
The red arrow shows where water is getting through the hole in the chimney cap. The hole was created by the fastener used to hold the cap down. This is a common problem that we have fixed on 100′s of home along the Wasatch Front. The green arrows show the staining and cracking that have been caused by water getting in through the hole in the chimney cap. The roof is also letting water behind the stucco system. This is evident by the staining and cracking that is shown by the blue arrows. Most contractors would just paint or install new stucco finish over the chimney, but without fixing the problem water will continue to get behind the stucco and rot out the 2x framing. In fact the additional layer of paint or stucco used to cover up the symptoms will accelerate the rotting process. Since another layer of paint or stucco will only keep the water trapped behind the stucco.
Failed Caulking
The yellow arrows show the common method used for chimney cap installation. A fastener (nail) is placed through the cap, then black caulking is applied over the fastener. This caulking fails and then allows water to get through the hole that the fastener created.
The orange arrow shows where black caulking is placed around the flu pipe that goes through the chimney cap. This black caulking will eventually fail and allow water to pass through the chimney cap and into the fireplace.
Properly installed chimney cap
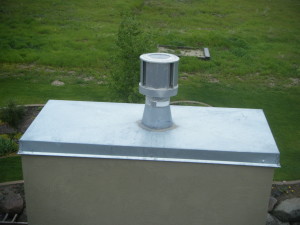
This picture show a chimney cap that was properly building installed. The fasteners were placed through the side of the cap and collar was welded to the chimney cap. No sealant is relied upon to keep water from getting through the cap.
